HAVE A LAUGH ( PREGNANT DATE)

That awkward moment when you are on a date with your girlfriend and she tells you that she is pregnant...Guess what Sunday Best did.

Please share with you friends & have a great weekend.


HOME REMEDIES FOR OILY SKIN

image from discovery.com

Oily skin can be difficult to manage, but there are many things you can do to solve this common problem. There is no need to use expensive, chemical-based skin care products. Many people have found simple home remedies to be equally effective.

Here are some home remedies for oily skin.

1. Egg Whites
High in vitamin A, egg whites can effectively dry out skin blemishes as well as tone and tighten up oily skin.

Whip one egg white until stiff and spread it on your skin. Allow it to dry and then wash it off with warm water. Do this twice a week.
Whip one egg white, add the juice from half a lemon and mix it well. Apply the mixture on your face, leave it on for 15 minutes and then rinse it off with warm water. This will tighten the skin and soak up excess oil.

2. Lemon Juice
Lemon juice is a good source of citric acid that works like an astringent. It also has antiseptic properties that can lighten skin discolorations and restore the skin’s pH balance.

Mix one teaspoon of fresh lemon juice with one-half teaspoon of distilled water. Apply it on your skin using a cotton ball. Leave it on for 10 minutes and then wash your face with warm water. Lemon juice can dry out your skin, so apply some oil-free moisturizer afterward. Do this once daily.
Mix one tablespoon of lemon juice, one-half tablespoon of honey and one tablespoon of milk. Apply this paste on your face and leave it on for 10 to 15 minutes before washing it off with cold water. If done once daily, this remedy will give you positive results within a week.

3. Yogurt
Yogurt contains lactic acid that helps gently exfoliate the skin and absorbs excess oil from the face.

Apply one tablespoon of plain yogurt thoroughly over your face and leave it on for 15 minutes. Then rinse it off with cool water. Do this once daily.
Alternatively, mix one tablespoon each of organic yogurt and finely ground oatmeal. Then stir in one teaspoon of warm honey. Apply the mixture on your face. Leave it on for 10 to 15 minutes and then rinse with warm water.

4. Tomatoes
Tomatoes are great for oily skin due to their cooling, clarifying and astringent properties. The high vitamin C content in tomatoes is very helpful for acne-prone skin. Plus, the natural oil-absorbing acids in tomatoes help get rid of excess oil.

Cut a tomato in half and rub it on your skin.
Allow the juice to soak into your skin for at least 15 minutes.
Rinse your skin with cold water, pat it dry and apply a light oil-free moisturizer.
Note: You can also make a face mask by combining three tablespoons of tomato juice with one tablespoon of honey.

5. Apples
Apples work as a great exfoliating agent and they have mild antiseptic, astringent, and soothing properties that make them a great home remedy for oily skin. The malic acid in apples helps exfoliate dead skin cells and absorbs excess oil from the skin’s surface.

Grate half an apple and place the shreds on your skin. Leave it on the skin for 15 minutes and then wash it off with tepid water.
Mix one teaspoon each of grated apple, yogurt and lemon juice to form a smooth paste. Apply it all over your face and leave it on for 15 minutes. Then rinse your face with cool water.

6. Cucumbers
Cucumbers are also very beneficial for oily skin due to their cooling, astringent, and soothing properties. Also, the high vitamin and mineral content, including vitamins A and E, magnesium, and potassium, are good for oily skin.

Cut a fresh organic cucumber into thick slices, and rub them thoroughly on your face. Leave it on overnight and rinse with warm water in the morning. Do this daily before going to bed.
Alternatively, mix one-half teaspoon each of cucumber juice and lime juice. Apply this mixture to your skin, let it dry, and then wash it off with warm water. Do this daily. This remedy can also be used to lighten freckles and reduce sunburn.

Have fun trying out these tips and visit a BMPRO outlet today

www.top10homeremedies.com

NEW WAYS TO LOOK YOUNGER ON A BUDGET!!!


When money's tight, it may seem that beauty indulgences should be the first things to go. But just because your budget calls for some belt tightening, that's no reason not to look better than ever. The trick is to bolster your beauty routine by making no- or low-cost moves that deliver maximum impact. From hiding dark circles to boosting hair's shine, here are experts' top tips for trimming costs—and a few years, to boot!

To Pump Up Hair's Volume...
Switch to mousse. It costs the same as other styling products, but because it contains resins that lightly coat strands to add thickness and lift hair at the root, mousse delivers far more oomph, says Renee Cohen, senior stylist at Serge Normant at the John Frieda Salon in New York City.
Dry hair upside down. To build volume when you blow-dry, work a palm full of mousse from your roots through to the ends, then flip your head over and dry your hair away from the scalp. "Hair should be barely damp before you flip it back up and style it," she says. (Think you know the healthiest way to dry your hair? Don't be so sure...)
Brush in fullness. Using a round brush to style hair builds in more volume. Pick a medium-size brush (for longer hair) or small (for shorter)—the full circle of bristles will give roots a lift as you blow-dry, brushing in the opposite direction the hair is going to lay. Hook the brush under a 2-inch section of hair at the root, and lift as you roll it through to the ends—all the while following the brush with the dryer. Keep the nozzle above your brush and pointed down to increase shine.

To Soothe Skin...
Get milk. Soak a clean washcloth in cold milk and place it over your face for 10 minutes. "Milk contains proteins, fat, amino acids, and vitamin A—all of which reduce redness and calm irritated skin," says David Bank, MD, a dermatologist in Mount Kisco, NY. Bonus: The lactic acid in milk exfoliates, so skin looks soft and glowing.

To Banish Brown Spots..

Camouflage with care. First, dab concealer that’s one or two shades lighter than your foundation onto the spot. Use a concealer brush—it'll give more precise coverage than your finger. Follow with a dot of foundation that exactly matches your skin tone. "The concealer lightens the spot, and the foundation helps blend it seamlessly," says New York City-based makeup artist Jessica Liebeskind.

To Boost Radiance...
Replace your makeup wisely. "Switching from powder formulas to creamier ones gives your skin a soft reflective sheen," says Kimara Ahnert, a makeup artist in New York City. Cheeks tend to be drier than your T-zone, so as soon as you use up your powder blush, buy a light liquid or cream formula that imparts a youthful glow instead of leaving skin dull and matte.

To Plump Thin Lips...
Think pink. "Dark or bright colors call attention to the size of your lips, emphasizing thinness and fine lines around your mouth," says Liebeskind. Instead, choose a lipstick that mimics the color of your lips when you were younger.
Define your lips. After applying your lipstick, line just at the outer edge of the natural border of your mouth with a pencil in a shade that exactly matches your lipstick. Don’t try to draw on a bigger pout—it'll only look fake. (Check out these other quick tips to plump thin lips.)

To Brighten Your Smile...
Mix your own whitener. Brushing with a paste made of baking soda and water a few times a month removes superficial staining and whitens teeth by a shade or two. "The graininess neutralizes stains and polishes teeth but isn't abrasive enough to wear down your enamel," says Jennifer Jablow, DDS, a cosmetic dentist in New York City.
Keep teeth whiter, longer. To sidestep stains when drinking red wine, chase your vino with a handful of crunchy raw vegetables. "They have a brushing action that can rub away newly setting stains," says Jablow.
Choose the right lipstick shade. "Colors with blue undertones make teeth appear brighter," explained Liebeskind. To figure out which of your lipsticks fit the bill, she recommends lining up three or four shades—in comparison to each other, it will be more obvious which are blue-based and which have yellow or gold undertones that bring out the yellow in teeth.

To Minimize Undereye Circles...
Be generous with your concealer. "The biggest mistake women make is using too little concealer," says Liebeskind. Start by putting on eye cream—concealer can settle into fine lines of all skin types, especially drier complexions. Then apply a generous layer of concealer from the inner corner of the eye around to the outer corner with a concealer brush. Pat and press the product into the skin to blend. If there's still any darkness visible, apply a second layer of concealer. Set the concealer with a dusting of face powder that matches your foundation. (Watch a pro cover demonstrate how to cover dark circles with this quick video.)
Caffeinate your eyes. Tea bags can perk up tired-looking eyes. "The caffeine helps shrink the underlying dark blood vessels and forces out some of the liquid that creates puffiness," explains Ava Shamban, MD, assistant clinical professor of dermatology at UCLA. Soak tea bags in hot water for a minute before plunging them into ice water for a few seconds. Lie down and apply them directly to your eyes for 15 minutes.

To Smooth Wrinkles...

Keep makeup outside the lines. To be sure there's no excess makeup to settle into—and emphasize—the fine lines around your eyes and mouth, Ahnert suggests using a dry makeup sponge to gently smooth and blend makeup after applying it. Don't wipe, though, or you'll rub it off.


Read some more at www.prevention.com

LIPSTICK TRICKS FOR NOVICES


Step 1: The most important step is to prep your lips. There are three ways I'll exfoliate - with a toothbrush, a sugar scrub, or using a wash cloth dipped in warm water and massaging in small circles. Also, I recently tested out this powered lip buffer and it's amazing.

Step 2: Apply an emollient lip balm. This is the first thing I apply when getting ready, so that I can leave it on while I do the rest of my make-up and get dressed. The longer it stays on, the softer my lips become.

Step 3: Gently remove lip balm. Skipping this step will result in lipstick that doesn't adhere well.

Step 4: Apply foundation to lips. This acts as a primer and creates a neutral canvas. Make sure to smile when putting it on to fill in the cracks so the lipstick will apply evenly.

Step 5: Blot foundation.

Step 6:. Line lips with a pencil in a shade that closely resembles your natural lip color.

Step 7: Apply lipstick in a criss-cross pattern at the cupid's bow, the outer corners and the bottom of the lip.

Step 8: Working from the initial starting points, use a "connect-the-dots" method to fill in the rest of the lips.

Step 9: Blot lips and apply one final layer of lipstick.


Step 10: Using a small brush, apply concealer around any areas that need to be cleaned up.

Have fun trying out these tips and find out more from http://cupcakesandcashmere.com/

HOW TO GET RID OF BLACKHEADS!

Blackheads are common and annoying too. These can happen to both men and women. Blackheads happen when the pores of the skin get clogged – it may happen due to excess sebum secretion from the sebaceous glands that exist in our skin; or it can happen due to dry dead cells. There is a common misconception that blackheads happen only because of dirt accumulation, and that scrubbing them well can make you get rid of them. Excess scrubbing would only make your skin dry and may even scar it. There are many clinical treatments available that can make you get rid of blackheads. But before you think of going for them, try these simple home therapies – you shall see positive results soon!
 Steam them out!
Fill up a large bowl with boiling water. Now cover your head and face with a towel and lean over the bowl for about 10 minutes. Make sure that the steam cannot escape. But take care not to go too near the boiling water. After 10 minutes remove the towel and pat dry the face. Apply moisturizer. The steam softens the sebum and helps to bring it out so that it no more clogs your pores.
Clear off with Clay!
Take enough quantity of Bentonite or cosmetic clay and make a thick paste using apple cider or water. Apply a thin layer of it on your face and leave it on for about 20 minutes. When the pack is dry, rinse it off with lukewarm water. Now pat dry and apply moisturizer. Repeat this twice weekly. The clay provides the essential minerals, improves blood circulation and tones the skin.
 Honey and Cinnamon Pack
In a bowl take equal quantities each of honey and cinnamon and make a paste. Now apply this paste on your blackheads. Take a small strip clean light cotton cloth and place it on the pack. Pat well to ensure that the cloth sticks to the paste. Leave it on for about 5-7 minutes. Now peel away the cloth. Wash the area with lukewarm water, pat dry and apply moisturizer. Honey is both antiseptic and adhesive. Cinnamon is natural healer. Together they can pull out the blackheads with time.
 Egg White Mask
Egg whites are loaded with nutrients that are beneficial for your skin. Apart from that egg white can tighten the skin pores and both eradicate and prevent blackheads. Take enough quantity of egg whites and apply a thin layer on your clean dry face. Now put a facial tissue on your face and pat to ensure that it sticks well to the mask. Let the mask feel dry. Now apply a second coat of egg white and press it with another facial tissue. Let it try and repeat the same process once more. When this third layer of egg whites dry up, peel together all the facial tissues away from your skin. Wash the area with lukewarm water, pat dry and apply moisturizer. Repeat this twice a week for best results.
 Lemon Juice
Blackheads kind of enlarge the pores. And the vice versa is also true. That is, enlarged pores provide a home for blackheads to nest. Lemon juice is an active antioxidant that provides toning to your skin and tightens the pores. This helps you to get rid of blackheads. Squeeze about two lemons and apply the extract all over your face and leave on for a couple of hours. You can apply this at bedtime too. In the morning, simply wash off with lukewarm water first, then cold water. Now pat dry and apply moisturizer.
 Mint and Apple Cider Vinegar
Take a bottle of apple cider vinegar and add mint leaves to it. Keep the bottle in a cold dry place for about a week. Now strain the contents and add a cup of water to the liquid. This liquid can now be stored in the fridge and be used for a week. Clean your face. Apply this mixture over the affected areas at bedtime with a clean cotton ball and leave it on the whole night. Rinse this off your face the first thing in the morning and apply moisturizer. The cider helps to remove the blackheads while the mint reduces the inflammation caused in the area due to the blackheads. Repeat it daily for a month and see blackheads vanish.
Baking Soda
Baking soda used in moderation can be a good cleansing agent for the skin that can flush out blackheads from the pores. Take some baking soda in a bowl and add water to make a thick yet spreadable mix. Take some of this mixture on your fingers and massage over the affected areas in circular motion. Let it dry for a couple of minutes. Wash the area with lukewarm water, pat dry and apply moisturizer. Do this twice weekly.
Green Tea Paste
Green tea is very effective in treating blackheads. Make a paste of dried green tea leaves and water using a blender. Make sure to make a coarse paste. Now apply this generously on the affected area. Massage in circular motion for about 2-3 minutes. Rinse with lukewarm water. The gentle scrubbing would help to clean the pores. The process should be repeated thrice weekly for best results.Exfoliating your skin not only provides a soft glow to your skin but also removes the dirt and dead cells from the pores thereby helping you to get rid of blackheads and also to keep them away. Sugar acts as a wonderful natural exfoliating agent. But scrubbing should also be accompanied by moisturizing. For this, take about 4 tablespoons of sugar and mix in jojoba oil to it to make a coarse thick paste. You can store this mixture in a clean dry container and use up to about 6 weeks. Take some of the paste and massage over the affected areas in circular motion. Wash the area with lukewarm water, pat dry and apply moisturizer.
We have discussed means of getting rid of blackheads. But don’t they always say that prevention is better than cure? So, here are some –
 Tips to Prevent Blackheads
  1. Clean your face regularly with natural cleanser.
  2. Exfoliating twice a week would help your pores unclog and breathe easy.
  3. Treat your skin gently – never be harsh on it while cleansing or drying.
  4. Drinking adequate water would help to flush out the toxins from your body.
  5. Always remove your makeup at the end of the day.
  6. Keep your hair away from your face for the oil and grime of the hair can affect your skin.
  7. Keep your bed linen clean – change your pillow covers and bed linen weekly.
  8. Always check out the ingredients of facial products before buying.
  9. Try and stick to natural products for your skin.
Never pop or pick the blackheads

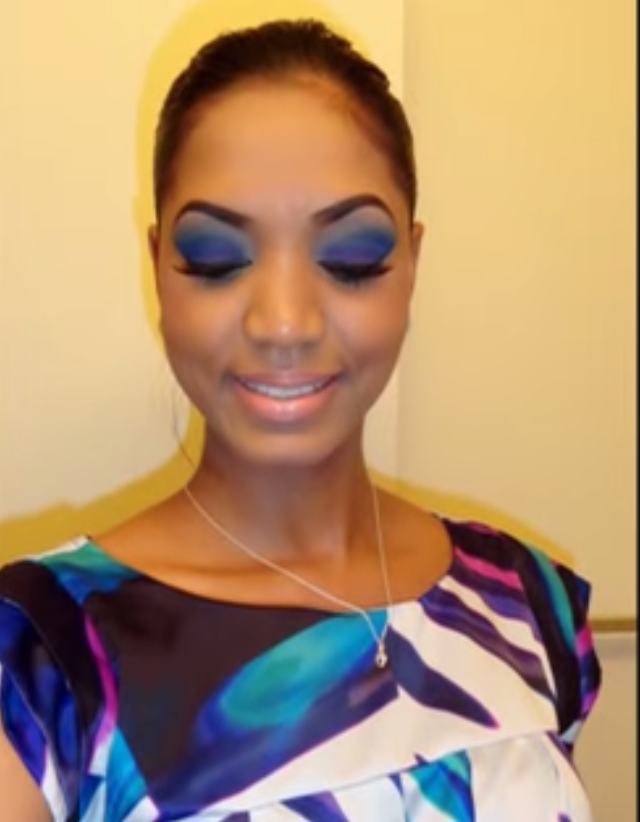
MAKEUP TUTORIAL | DARK BERRIES LOOK ( USING INGLOT BODY PIGMENTS)


We love this tutorial from The Fancy Face!  She calls it Dark Berries, but we think it’s a great look for those who love blue peacock tones with a bit of teal.  It’s very bold, but it’s also practical and controlled.  That’s hard to have with that much color on your eyes.  This look is for light to caramel skin tones.  Those Inglot pigments are amazing on her.  

(Be Sociable, Share!)

5 MISTAKES THAT ARE MAKING YOU LOOK OLDER!!


MISTAKE # 1: Wearing foundation that does not match your skin color.
Many women end up looking they have a floating head or they are wearing a mask because their foundation does not match their face and neck. When you go too light it makes your skin appear flat and lifeless. Instead of natural, it will look like the makeup is just sitting on your skin, which can add years to your face. But if you go too dark, you are not highlighting your features, but dragging them down and adding a dullness and heaviness that is just as aging.

In order to get the right color, when testing out a foundation, do not blend it in too much. Simply tap it on your face from the top of your cheekbone to the bottom of your jawline and try to not go lighter or darker than your actual skin. If you are tan on your neck and body, you can bring that color into your face with a bronzer, without having to use a foundation that's too light. The goal is to connect your skin by blending it evenly across.

MISTAKE # 2: Choosing a lipstick that is too dark.

As you age, you lose definition in your lips, so to appear more youthful, you'll want to wear a lipstick that adds fullness. A dark color does just the opposite, making your lips look smaller, less plump, and less highlighted. Instead, choose something in a mauve or pink tone. Adding a layer of gloss is helpful as well. Many women feel like they are too old to wear lip-gloss, but a shiny finish will actually add a youthful plumpness.

Related: The Best Nude Lipstick for Every Skin Type

Don't worry, this doesn't mean that you're forbidden from trying out all the berry and wine hues that are so popular for fall. But if you decide to go dark and are concerned about looking older, stay away from something with a heavier texture or matte finish because it will stay flat on your lips. Opt for a sheer and hydrating formula or a lip stain.

MISTAKE # 3: Only lining the bottom of your eyes with liner.

"So many women I talk to say 'I only line the bottom,'" Soane told us. "And when I ask them why, they say because 'It's easier.' It's tragic; top liner is mandatory." Though it may be easier to apply eyeliner on the bottom, only doing so will drag your features down and make your eyes appear smaller and your overall appearance seem older. Applying eyeliner on the top as well will open your eyes up and brighten your face. But be sure not to make the liner too thick, which can also be aging.
When applying eyeliner, try to get the product as close to your lash line as possible, so it appears to be an extension of your eyelashes. Start at the outer corner and work your way in along the top lash, then do the same for the bottom, but apply the line a little thinner than the top. Make sure that the bottom and top lines connect at the corner of the eye and add a touch of dark shadow to the bottom of the eye to soften the look.
MISTAKE #4: Applying the wrong shade of blush too low on your face.

Many women do not wear a shade of blush that adds youthfulness to their face. Some choose a brown color because they think they are adding definition and contouring, but it ends up looking muddy, dull, and like the makeup is just sitting on your skin. Other women often choose a product that is too soft in color, which can wash you out and age you as well.
To find the right shade, pinch your cheeks and try to match the natural color that you get when you actually blush. When applying, start at the height of the apple of your cheek and blend it up and back. Some people apply blush on the bottom of the cheekbone, but you want to place it higher to define and lift your features.

MISTAKE #5: Not adding color and defining your brows.

As you get older, your eyebrows get thinner, or simply from years of over-plucking, they just don't grow back. Not filling them in with a pencil or brow powder can leave you washed out and looking older, while a full brow will lift the face, define your features, and create an overall youthful appearance.
To pick a brow product, look for ones that are the same shade as your hair. If you are blonde, choose something that matches your roots; for silver or white hair, go for a soft gray tone; if you are brunette or redhead, try a mahogany or sable. For those with fair to medium skin, steer clear of anything that is red-based, and if you have a darker skin tone, choose something with warmth. Start by brushing your brows up and over. Then square the head of your brow off with the product and bring the color through the arch, all the way to where your brow would naturally end.

Tip from  Kimberly Soane, the director of artistry at Bobbi Brown


Have fun